
How to Wire a New Construction Home for Maximum Future-Proofing
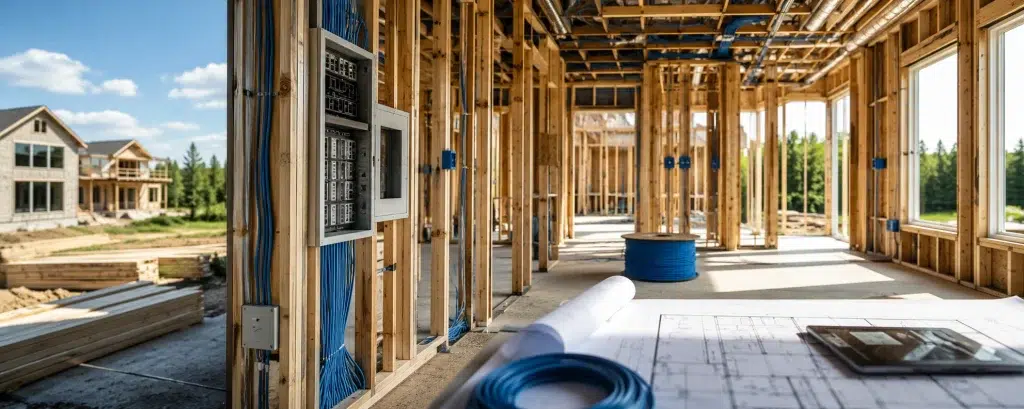
You only get one “easy” chance to wire a home: before the drywall goes up. After that, every upgrade becomes slower, messier, and more expensive. If you want future-proof home wiring, the smartest time to plan it is during framing, when you can still choose the right cable paths, closet location, and drop count. In addition, a future-proof new construction plan helps you build a home network future proof enough for modern WiFi, cameras, work-from-home, and smart home devices. For many builds, Cat6a new build wiring is also a practical step toward long-term performance and resale value.
What “future-proof new construction” really means in 2026
Future-proofing does not mean guessing every device you will own. Instead, it means building flexible infrastructure that can support new devices, higher speeds, and better WiFi without opening walls. Therefore, your goal is to install the pathways and cabling that make upgrades simple.
Future-proof home wiring is about three things
- Coverage: wired access points so WiFi is predictable
- Capacity: enough drops so fixed devices do not overload WiFi
- Changeability: conduit and clean pathways so you can add or replace cable later
Real-world scenario: A homeowner moves into a brand-new house with a high-end router. The living room is fine, however the office and upstairs bedrooms are inconsistent. They add mesh nodes, but performance still varies. The missing piece is wired access points and wired drops in the right places.
Expert Insight: The easiest way to make a home network feel “premium” is not a more expensive router. It is wiring the access points and wiring the rooms where people actually work and stream.
Start with the “network heart”: where your structured wiring should live
Your wiring plan will only be as good as your central location. Therefore, choose a dedicated network area that can handle power, heat, and growth. This is where your modem, router, switch, and terminations will live.
What a good network closet (or structured media area) needs
- Enough wall space for a panel or small rack
- Two power outlets (or a dedicated circuit for larger builds)
- Ventilation (network gear and PoE switches generate heat)
- Clear access for service and upgrades
- A path for ISP entry that does not force the router into a bad WiFi location
Where not to put it (common mistakes)
- Hot attic spaces
- Tiny closets with no airflow
- Behind shelves where you cannot reach terminations
- Near water sources or areas prone to leaks
Common Mistakes: Why new homes still end up with messy networks
Problem: The ISP drop lands in a laundry room corner, so all network gear gets stuffed there.
Why it happens: The ISP entry is planned for convenience, not for WiFi performance or serviceability.
What it causes: Poor WiFi placement, overheating gear, and difficult troubleshooting later.
Cat6a new build vs Cat6: what to choose and why
Most homeowners hear “Cat6” and assume it is automatically future-proof. Cat6 is still useful, however Cat6a is often a better long-term choice for new construction because it supports higher performance over longer distances and handles noise better. Therefore, many builders use Cat6a for key runs and keep Cat6 for shorter, lower-demand areas.
Simple guidance for Cat6a new build decisions
- Use Cat6a for long runs, office drops, and any location likely to need higher speeds later.
- Use Cat6 for shorter runs where 10Gb is unlikely to be needed.
- If budget allows, standardize on Cat6a for consistency and resale value.
Practical note: The cable cost difference is usually smaller than people expect. Labor and access are the expensive part. Therefore, upgrading cable type during construction is often cheaper than upgrading later.
Home network future proof: wire the things that don’t move
If you want a stable home network, keep WiFi for mobile devices and wire fixed devices. Therefore, your WiFi stays fast and your critical devices stay reliable.
High-impact locations to wire in almost every new home
- Ceiling access points: one per floor as a baseline
- Home office: at least two drops at the desk wall
- TV walls: two drops behind each TV (streaming + future devices)
- Gaming areas: wired is more stable than WiFi for latency
- Garage: one drop for future expansion
Smart home and security wiring to consider
- PoE camera locations (front door, driveway, backyard, side gates)
- Doorbell wiring and chime location planning
- Locations for smart home hubs (central, accessible, not hidden behind metal)
- Optional: wiring for access control or gate controllers
Tips: A simple “minimum viable” future-proof wiring plan
- Run Cat6a to every planned access point location and home-run it to the network closet.
- Wire every TV wall and every office wall, even if you “might not need it.”
- Add conduit from the network closet to attic/basement/crawl for future pulls.
Step-by-step: future-proof home wiring plan for a new build
Future-proofing works best when you treat wiring like a design phase, not a last-minute add-on. Therefore, use this step-by-step approach during planning and framing.
Step 1: Map your lifestyle zones (not just rooms)
- Work-from-home zone
- Streaming and entertainment zone
- Outdoor living zone
- Garage or workshop zone
- Security coverage zone
Step 2: Choose access point locations (coverage first)
- One access point per floor as a baseline
- Add more for long layouts, heavy walls, or large open areas
- Prefer ceiling locations for consistent coverage
- Avoid placing access points inside metal enclosures or tight utility closets
Step 3: Decide your drop counts by room type
- Office: 2–4 drops
- TV wall: 2 drops
- Bedrooms: 1–2 drops
- Kitchen: 1 drop if you plan smart displays or a hub location
- Garage: 1–2 drops
Step 4: Add conduit for true future-proofing
Conduit is the cheat code for future upgrades. Therefore, even if you do not pull every cable today, you can add it later without opening walls.
- Conduit from network closet to attic
- Conduit from network closet to crawl/basement (if applicable)
- Conduit to key TV walls (optional but valuable)
- Leave pull strings and document pathways
Step 5: Plan power and PoE needs
Many future-proof builds use PoE (Power over Ethernet) to power access points and cameras. Therefore, you can avoid outlets in awkward locations and keep installs clean.
- Choose a switch with enough PoE budget for access points and cameras
- Plan a UPS for modem/router/switch to keep the network online during short outages
- Keep the network closet ventilated to handle PoE heat
Expert Insight: When a homeowner says “I want whole-home WiFi,” what they really need is a wired access point plan plus enough wired drops to keep WiFi from doing all the work.
Structured cabling installation: quality standards that matter
Future-proof wiring is not only about what you run. It is also about how you run it. Therefore, installation quality determines whether your network is stable or full of mystery issues.
Structured cabling installation best practices
- Use home-run cabling to a central location (no splices, no daisy chains)
- Avoid tight bends and crushed cable behind staples
- Keep low-voltage separated from high-voltage where practical
- Use proper termination methods and consistent pinout
- Protect cable at studs and penetrations
Cable labeling standards (make future service easy)
- Label both ends of every cable
- Use a consistent naming scheme (Floor-Room-Wall-Port)
- Match labels to a simple as-built map
Cable certification testing (don’t skip this)
Testing is what separates “we ran cable” from “this is a professional install.” Therefore, insist on testing and documented results.
- Test every run before drywall (catch damage early)
- Test again at trim-out
- Keep results with homeowner documentation
Commercial network cabling lessons that apply to homes
Many of the best practices in commercial network cabling translate directly to residential builds. In addition, these practices reduce troubleshooting and improve long-term reliability.
- Centralized termination and clean patching
- Labeling that matches documentation
- Testing and recorded results
- Consistent pathways and service loops where needed
Common Mistakes: Future-proofing failures we see all the time
Too few drops: People assume WiFi will cover everything, then end up with congestion and dead zones.
No conduit: Upgrades require opening walls, so they get delayed or skipped.
Unplanned access points: Mesh becomes the default, even when the home layout needs wired APs.
No documentation: Future service becomes guesswork, which increases cost.
Best practices checklist: future-proof home wiring you can hand to your builder
- Choose a dedicated network closet with ventilation and power
- Run Cat6a to access point locations (home-run)
- Wire TV walls and offices with extra drops
- Plan PoE camera locations and run Cat6a to each
- Add conduit from the network closet to attic/crawl for future pulls
- Label both ends of every run
- Require cable certification testing and keep results
- Get an as-built map of drops and pathways
Tips: How to keep the scope budget-friendly
- Prioritize access points, offices, and TV walls first.
- Add conduit even if you reduce the number of drops today.
- Standardize cable type and labeling to reduce labor complexity.
FAQ: future-proof home wiring
Is Cat6a worth it for a new construction home?
Often, yes. Cat6a provides more headroom and is a strong choice for long runs and high-demand areas. However, a mixed approach can also work if budget is tight.
How many access points should a new home have?
A simple baseline is one per floor. In addition, large homes or heavy walls may need more. The key is wiring the locations so you can add or adjust later.
Do I really need conduit?
If you want maximum future-proofing, conduit is one of the best investments. It makes future upgrades possible without opening walls.
What should I ask for from my low-voltage installer?
Ask for labeling, an as-built map, and cable certification testing results. Therefore, you can troubleshoot quickly and avoid guesswork later.
What’s the biggest mistake people make when wiring a new build?
Under-wiring. People assume WiFi will solve everything. However, wiring fixed devices and access points is what makes WiFi feel fast and reliable.
Conclusion: Future-proofing is easiest before drywall
Future-proof home wiring is not about overbuilding. It is about making smart, flexible choices while the walls are open. Therefore, if you plan a proper network closet, wire access points, add enough drops in key rooms, and include conduit for future pulls, your home network future proof plan will hold up for years. A well-designed future-proof new construction wiring scope also protects resale value and makes upgrades simple as technology changes.
Suggested internal link anchor text (anchor text only):
- wired home infrastructure checklist for new builds
- how to choose access point locations in a new construction home
- Cat6 vs Cat6a for residential structured wiring
- PoE camera wiring plan for new homes
- network closet setup checklist for homeowners
Want a Future-Proof Wiring Plan Before Drywall?
We’ll help you design a clean, labeled, tested wiring plan with the right Cat6a drops, access point locations, and upgrade pathways so your new home is ready for whatever comes next.
Call: 833-469-6373 or 516-606-3774
Text: 516-606-3774 or 772-200-2600
Email: hello@unifinerds.com | Visit: unifinerds.com
Free consultations • Phased implementation • Budget-friendly • Expert support